Details Custom Cabinetry
Attentive care, skilled craftsmanship, and an eye for beauty in every phase of the process.
Getting Started
Below is a step by step guide for measuring the space for your cabinetry. Once you have this information, call us for an appointment. We are happy to provide this service for a fee of $100.00. Fee waived with contract.
NOTE: If you are remodeling, do not include current cabinetry or other furniture that will not be kept, such as kitchen tables, in your measurements.
NOTE: All of your measurements should be in inches. For example, if you measure a wall that is 10 feet, write it as 120″ ( a quotation mark (“) denotes inches ).
Tools needed:
- 2 Sheets of paper
- Pencil
- Tape Measure
- Helper
- These step-by-step instructions
STEP 1
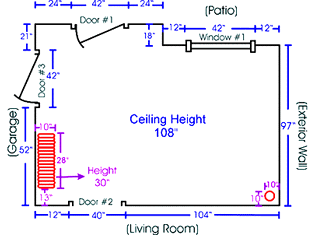
Draw shape of room (as if you are looking at it from the top) on the paper. Label the walls (wall #1, wall #2). Draw where the windows and doors are and label them as well.
STEP 2
Draw in and label any obstructions such as radiators, pipes, sink plumbing, etc. that you either can not, or do not, want moved.
STEP 3
- Using your measuring tape, measure the length of all the walls and write them down next to their appropriate number on your paper.
- Measure the doors and windows. When you are measuring them, remember to measure from the outside of the trim on one side to the outside of the trim on the other side. As you are measuring, write down the measurements on the sheet of paper where you have already labeled them.
- Measure the ceiling height and write it in the center of your drawing. You might want to measure the ceiling in a few different spots because the height of the ceiling may change around the room.
- On your next paper, you will need to put some more information about the measurements. Measure from the floor to the bottom of each window, and write that down. Then measure from the bottom of the window to the top of the window, and write that down. Remember to measure using the inches mark on your tape measure.
STEP 4
Next to each wall, write the name of the adjacent room. If the wall is an “outside wall” write “exterior wall.”
STEP 5
- Measure any obstructions such as radiators, pipes, etc. that you either can not, or do not, want moved. If the obstruction is close to a wall, measure out from the wall to the edge of the obstruction. Write these measurements on your first paper next to the labeled obstruction.
- Measure from the second closest wall to the edge of the obstruction. Write these measurements on your first paper next to the labeled obstruction.
- If the obstruction does not reach the ceiling, measure the height of the obstruction. You can write that information on your second paper.
Final Step:
Check your measurements. If your room is rectangular add up the measurements of the parallel walls and make sure they match (or are at least very close). For example, in our sample drawing, you would take the overall measurements of the top wall and add them together. Then do the same with the bottom wall. Once you have added each walls measurements check the totals to see if they match.

